Simple Apple Crisp: Your Go-To Recipe for Pure Comfort
There are some desserts that just whisper "home." A warm, bubbling apple crisp, fresh from the oven, with its tender, spiced apple filling and irresistible crunchy oat topping, is undoubtedly one of them. It's a dish that embodies comfort, nostalgia, and a heartwarming simplicity that makes it a perennial favorite. Forget complicated pastry work or lengthy ingredient lists; this
apple crisp recipe delivers maximum satisfaction with minimal fuss, proving that the most delicious things in life are often the easiest to create.
Whether you're looking for a cozy treat on a chilly evening, a crowd-pleasing dessert for a family gathering, or just a simple way to celebrate the bounty of apple season, this guide to making the perfect apple crisp is exactly what you need. Get ready to fill your kitchen with the sweet aroma of baking apples and warm spices, and prepare for a dessert experience that truly hits the spot.
Why This Simple Apple Crisp Recipe is Your New Favorite
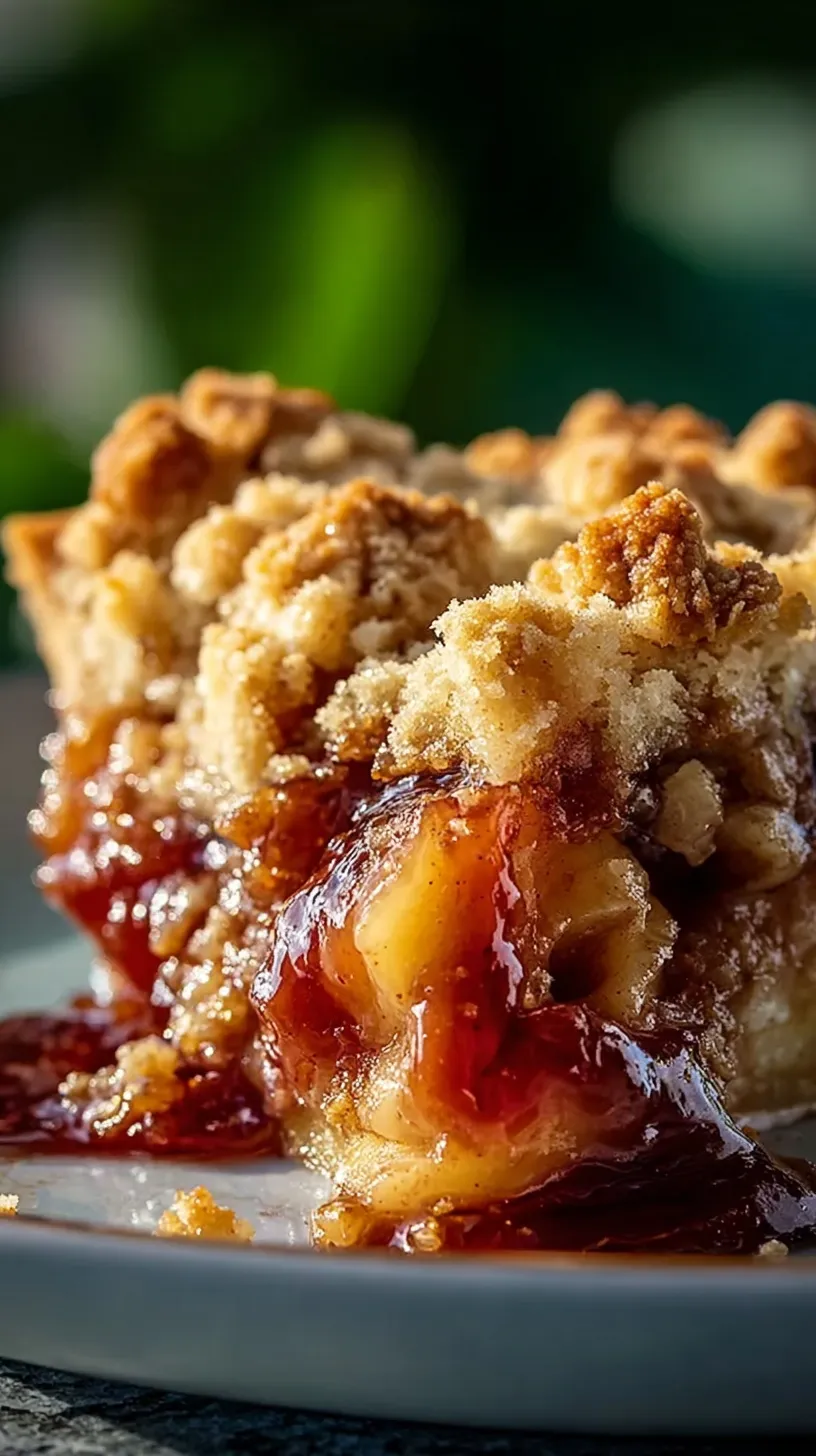
What sets a truly great
apple crisp recipe apart? It’s often the balance of flavors and textures, combined with an undeniable ease of preparation. Unlike its more demanding cousin, the apple pie, a crisp bypasses the need for rolling out dough, making it a much more approachable project for bakers of all skill levels. This recipe shines precisely because it focuses on the inherent deliciousness of fresh apples, enhanced by a wonderfully buttery, sweet, and textured topping.
We're talking about crisp apples, softened to perfection, infused with cinnamon, and lovingly tucked under a golden, crumbly streusel. The sweet oat topping offers a delightful textural contrast that elevates each spoonful. It’s bubbly and warm, with caramelized edges that are utterly divine. While fantastic on its own, a scoop of vanilla ice cream melting into the warm fruit is practically mandatory, creating a symphony of hot and cold, creamy and crunchy. You can even impress guests further with a drizzle of homemade caramel sauce for an extra touch of indulgence. This isn't just an easy apple crisp; it's an experience waiting to happen.
Mastering Your Apple Crisp: Ingredient Spotlight
The magic of a truly great apple crisp lies in its simple, high-quality ingredients. Understanding the role each component plays will help you create a consistently delicious dessert every time.
The Apples: The Heart of the Crisp
You'll need a generous 10 cups of peeled, cored, and sliced apples. But which apples are best for crisp? The ideal apple for a crisp holds its shape well during baking and offers a good balance of sweetness and tartness. While many "all-purpose" varieties work, a blend can yield the most complex flavor.
Sweet apples like Honeycrisp or Fuji are fantastic for their firm texture and natural sugars. For those who prefer a bit more tang and a guarantee that your apples won't turn to mush, crisp Granny Smith apples are an excellent choice. Their tartness beautifully complements the sweet topping. For a deeper dive into selecting the perfect fruit, check out our guide on
Best Apples for Crisp: Granny Smith vs. Honeycrisp & Fuji.
Sweetness and Spice: Sugars and Cinnamon
Our recipe calls for two types of sugar to achieve the perfect flavor profile.
White sugar is used in the apple filling to sweeten the fruit and create that delightful bubbling, syrupy base. For the topping,
packed brown sugar is essential. Its molasses content adds a deeper, richer flavor and contributes to the topping's chewiness and beautiful golden-brown caramelization. A teaspoon of aromatic
ground cinnamon is crucial, infusing the apples with warmth and a classic, comforting spice that pairs perfectly with the fruit. Don't be afraid to experiment by adding a pinch of nutmeg or allspice for an extra layer of flavor.
Structure and Texture: Flour, Oats, and Leaveners
All-purpose flour serves a dual purpose here: a tablespoon helps thicken the apple filling, preventing it from becoming too watery, while a cup in the topping provides essential structure, binding the ingredients together to create that crumbly streusel. For the signature crunch,
quick-cooking oats are preferred in the topping. Their finer texture bakes up beautifully crisp and golden, unlike old-fashioned oats which might remain a bit too chewy for some crisp preferences. A touch of
baking powder and
baking soda acts as leaveners in the topping, contributing to a lighter, more tender crumb that enhances its irresistible texture.
Richness and Golden Perfection: Butter
Last but certainly not least,
melted butter is the magic ingredient that brings the oat topping together. It provides incredible richness, helps create that desirable crumbly texture, and ensures the topping bakes to a beautiful golden brown, perfectly crisp and caramelized around the edges.
The Ultimate Simple Apple Crisp Recipe
Ready to create this masterpiece of comfort? Here’s everything you’ll need and how to put it all together.
Ingredients
- 10 cups all-purpose apples, peeled, cored, and sliced (approx. 8-10 medium apples)
- 1 cup white sugar
- 1 tablespoon all-purpose flour (for filling)
- 1 teaspoon ground cinnamon
- 3 tablespoons water
- 1 cup quick-cooking oats
- 1 cup all-purpose flour (for topping)
- 1 cup packed brown sugar
- ¼ teaspoon baking powder
- ¼ teaspoon baking soda
- ½ cup butter, melted
Directions
- Prepare for Baking: Gather all your ingredients. Preheat your oven to 350 degrees F (175 degrees C). This ensures the oven is at the correct temperature for even baking.
- Assemble the Apple Filling: Place your sliced apples evenly in a 9x13-inch baking dish. In a small bowl, mix the white sugar, 1 tablespoon of flour, and cinnamon together until well combined. Sprinkle this mixture evenly over the apples, making sure they are well coated. Gently pour the 3 tablespoons of water evenly over the apples; this helps create a little steam and sauce as the apples cook.
- Create the Crumbly Topping: In a large mixing bowl, combine the quick-cooking oats, 1 cup of flour, brown sugar, baking powder, and baking soda. Mix these dry ingredients thoroughly with a fork. Pour the melted butter over the dry mixture. Using a fork, mix until the ingredients are well combined and the mixture forms distinct, crumbly clumps. Ensure you don't overmix; we're aiming for that perfectly crumbly texture. Sprinkle this oat topping evenly over the apple mixture in the baking dish.
- Bake to Perfection: Place the baking dish in your preheated oven. Bake for approximately 45 minutes, or until the apple filling is visibly bubbling through the topping, and the topping itself is beautifully golden brown, crisp, and caramelized around the edges. The aroma alone will tell you it's ready!
- Serve and Enjoy: Allow the crisp to cool slightly before serving. While delicious warm, letting it rest for 10-15 minutes allows the filling to set slightly. Serve as is, or with your favorite accompaniments!
Beyond the Bake: Storage, Freezing, and Serving Ideas
Once you've baked your magnificent apple crisp, you might find yourself with delicious leftovers – or perhaps you're planning ahead for future indulgence. Knowing how to properly store and serve your crisp ensures every bite is as good as the first.
Does Apple Crisp Need to Be Refrigerated?
Yes, apple crisp should absolutely be refrigerated. Due to its fresh fruit content, it's best to allow the crisp to cool completely at room temperature first. Once cooled, transfer any leftovers to an airtight container, or simply cover the baking dish tightly with aluminum foil or plastic wrap. Store it in the refrigerator for up to three days. Reheat individual portions gently in the microwave, or pop the whole dish back into a moderate oven until warmed through.
Can You Freeze Apple Crisp?
Absolutely! Apple crisp freezes beautifully, making it an excellent make-ahead dessert. If you plan to freeze it, consider baking it in a foil pan for easy freezer-to-oven transfer. Once baked and completely cooled, wrap the entire pan tightly in a layer of plastic storage wrap, followed by a layer of heavy-duty aluminum foil. Label with the date. Your apple crisp can be frozen for up to three months. To reheat, remove the foil and plastic wrap, cover loosely with foil, and bake from frozen in a preheated oven (around 350°F / 175°C) until thoroughly heated and bubbling, typically 45-60 minutes. For more detailed advice on preserving your crisp, check out our comprehensive guide on
Freeze or Refrigerate? Apple Crisp Storage & Serving Tips.
Elevate Your Serving Experience
While a simple scoop of vanilla ice cream is the quintessential pairing for warm apple crisp, don't limit yourself! Consider these delightful serving suggestions:
- Homemade Caramel Sauce: A luscious drizzle takes this dessert to an entirely new level of decadence.
- Fresh Whipped Cream: Lightly sweetened whipped cream adds a delicate, airy contrast.
- A Dusting of Powdered Sugar: Simple and elegant, it adds a touch of visual appeal.
- Toasted Nuts: A sprinkle of toasted pecans or walnuts can add another layer of crunch and nutty flavor.
- Greek Yogurt: For a slightly healthier twist, a dollop of plain or vanilla Greek yogurt provides a tangy creaminess.
Embrace the Comfort
This
apple crisp recipe is more than just a dessert; it's an invitation to slow down, savor simple pleasures, and create lasting memories. Its effortless preparation and comforting flavors make it a perfect choice for any occasion, from quiet weeknights to festive gatherings. So gather your apples, preheat your oven, and prepare to fill your home with the pure, unadulterated comfort of a warm, homemade apple crisp. It's a taste of pure joy, guaranteed to satisfy every time.